

The M3 Super 90 from TM is one of the best non AEGs on the market. It uses the now ubiquitous 10 shot red shells and fires each pump with three BB’s from a triple inner barrel hidden inside the outer. Accuracy is best described as excellent. The BBs spread a little over range meaning that in all practical terms the weapon is not so much a shotgun but actually a 3 shot counter sniper rifle.
If you think of it in these terms then this lends you the most effective strategy for its use. As a rushing weapon against AEGs it looses out in the fact that it takes a long time, relative to an AEG, to pump each round and not a little strength. However, used either defensively or as a first strike weapon it shines very bright.
Defensively, the spread, power and accuracy are excellent for picking off runners or assaulting forces. Aimed at head height you can hit two people who are tightly grouped with ease and you can effectively put down a barrage of ammo.
First strike is the guns use in an assault. It is very hard to totally defeat a position defended by three or more on your own, but partnered with another player or another gun you can easily take out 6 opponents especially if they are caught on the wrong foot.
The only problem is the default configuration. The full size M3 is very long indeed. This makes it difficult to use in the second configuration of an assault and very hard to manoeuvre through doors, etc in CQB. It also makes it hard to sling correctly so that you can drop it and switch weapons. I am going to outline the methods I used to correct these problems.
Firstly, the donor gun. The M3 Super 90 is an expensive gun bought new, but many people sell theirs through the net and they are often available on the forums. After a few days hunt I bought one second hand for £100. The only proviso is that you confirm and be sure that the gun is working correctly and hasn’t been broken. NOTE! The M3’s common fault is terminal to the gun, but invisible unless shooting. I will outline this later…
Modding for CQB.
CQB is known as follows:
Close Quarters Battle (CQB) or close quarters combat (CQC) is a type of fighting in which small units engage the enemy with personal weapons at very short range, even to the point of hand-to-hand combat. In the typical CQB scenario, the attackers try a very fast, violent takeover of a vehicle or structure controlled by the defenders, who usually have no easy way to withdraw. Because enemies, hostages/civilians, and fellow operators can be closely intermingled, CQB demands a rapid assault and a precise application of lethal force. The operators need great proficiency with their weapons, but also the ability to make split-second decisions in order to limit friendly casualties.
I slightly disagree with this defintion. For me CQB is fighting close, but not close enough to touch. CQC is fighting within arms reach. Both have different skill sets.
Bascially, when I am in CQB I use one gun, when in CQC I use two. So light guns are very important.
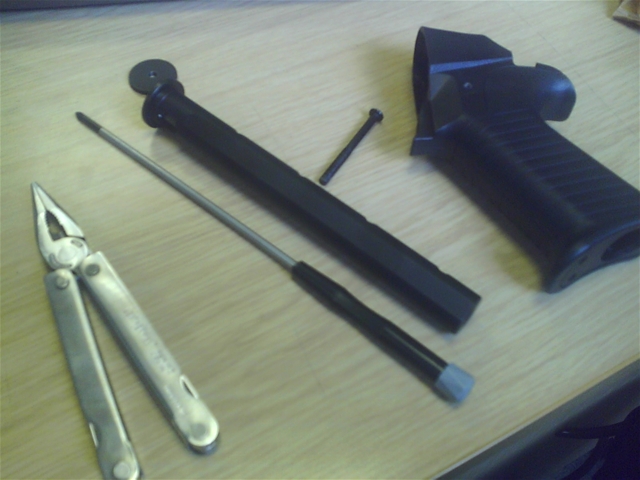
Tools you will need:
- Hacksaw
- Rino tape
- Masking tape
- Long thin screwdrivers
- Pliers
- Diamond file
- Hex keys
- NOTE! Many of these are found on the better Leathermans
Things you should buy:
- More shells – I have 9, bought whenever I saw them on the forums, £10

- Shell holder – free, came with tack vest, Velcro backed
- Torch and barrel mount – £12 eBay
- Smokeys TM M3 front grip – £30 Wolf Armouries
- G&P sliding M3 Stock – £65 Wolf Armouries


With all of these ready, let’s go!
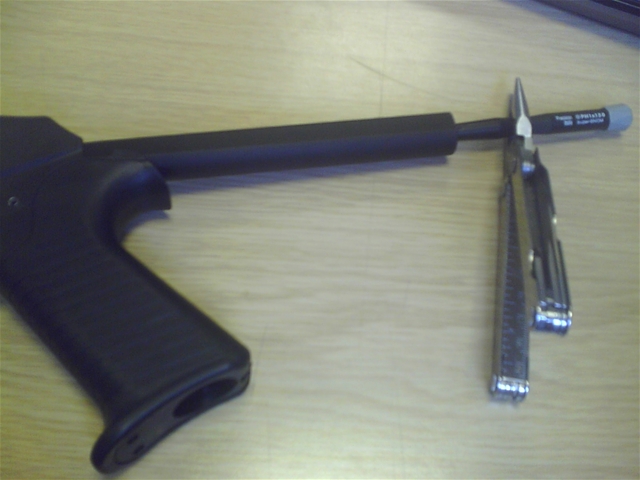
Barrel length:
The default M3 barrel is an amazing 1040mm long or 41 inches! This is frankly madness. The inner barrel length is a good 6 inches shorter. In other words, the extra length is not needed at all. So let’s get rid of it!
Pull out the little round cover that is in the bottom of the two pipes.
Measure the length of the inner barrels and mark this on the outside of the outer barrel. I used a ruler and pencil.
Unscrew the clip that attaches the two barrels.
Wrap the top and bottom barrel at the cut point with masking tape. This is to give you a line to follow and to stop slips marking the barrel.
Using the hacksaw cut the top and then bottom barrels off. Make sure that you hold the gun steady, observe all safety precautions of using saws and most importantly line up your cut with something so that it is straight. Leave enough barrel to get the clip back on and the laser mount on later.
Using the diamond file smooth off any burrs.
Done!


Next, the stock:
Pull off the rubber stock plug and unscrew the loooong screw.
Pull off the stock and hand guard.
Mark 1.9cm on the stock tube and be sure.

Put masking tape around the cut line as before.
Cut the tube.
The correct length is such that then you put on the new grip it will be flush on the inside.

Take off the sliding stock from the new tube
Using the long screwdriver, unscrew the holding screw while holding the round packing plate with the pliers.
Discard the round packing plate

Put the new grip on the tube, check that it is flush.
Using the long screwdriver feed the screw back into the tube and, while holding the tube at such a rotation that the bumps are at the top, screw it to the gun. Be careful with this screw. It is crap. I managed to wreak the stock screw and had to follow the procedure below.

- If you screw the screw then don’t panic. If you can’t get it back out (the head threads) then simply put some superglue on the screwdriver and then hold it in place on the screw head. When dry you should be able to get it out.
- In the original grip there is a similar screw to the new one, but it is longer. Using the hacksaw cut it to the required length. File it down to a flat end and it should work fine.

Once tightly on, replace the new butt and you are done here.

Extras:
- Remove the two screws on the underside of the front grip. Basically on the pump. Place the new Smokeys grip in place and, using the Allen keys, screw it in.


- Attach the barrel mount to the front of the stock and either place a laser or torch in this mount. I use an AA Maglite that has been converted to LED using the small £9 kit you can get almost anywhere. This also comes with a push button on/off.

- Either glue or tape the shell holder to your required position.
- Remove the shell guard that holds the shells it. It is a pain to use in combat, the shells never fall out anyway and it probs’ will get busted before long.
Done!


Now the gun is modded for CQB.
- The stock can now be reduced in length so that when you are attacking you can hold the gun away from the body and manoeuvre the backend with ease. On the other hand, when defending you can now extend the stock and improve your aim.
- The barrel is much shorter, but importantly has not lost any accuracy. The new length is much easier to use in close quarters and around corners. Aiming time has been reduced and the focal point looking over the barrel is now closer, meaning that very fast snap shooting it possible.
- These two mods’ mean that the gun can be easily slung in many ways. Personally, I use a Chalker quick sling; the best sling for CQB ever invented.

- The front grip mods’ makes the gun much much easier to rack in a combat situation and will stop the arm ache this gun gives for days after. It also acts as a stabilising point, like a tripod, when defending.
- The barrel mount allows you to overcome the lack of rails on this gun without resorting to the massively expensive RIS kit. NOTE! The RIS kit is also very very heavy. This guns weight is already forwards and you don’t want to add any more if you ever intend to use the gun in one hand.
- Two gunning. Now the gun is lighter, you can hold it in one hand and CQC with a pistol in your other. This enables you to shoot very close targets with the pistol and mid range threats with the increased accuracy of the shotgun.
Limitations:
TM stock M3’s eventually break. The damage is terminal to the guns operation and can only be checked by shooting some test rounds. Basically, the back-end of the inner barrels gets cracked by a stray BB being loaded. Fixing this is harsh. You need to cut open the barrel to get to it and have custom made metal tubes placed over the cracked plastic ones. Once this is done you can also upgrade the springs and insert better inner barrels. When mine breaks I will write up how to do it with images, but you can find a good page on Google. If it has gone, I have a print out so PM me.
Gun in Use:
Happy newb owning!
Basho


